
Configure vendor electronic documents
This page is for those who create and maintain vendors. With the vendor card set up correctly, invoices from the vendor become the right purchase documents in BC and orders reach the vendor electronically.
Purpose
On the vendor card you decide whether purchase orders go to the vendor electronically and how incoming invoices from the vendor become purchase documents in BC. This page covers every field in the eDocs group and what each one changes.
Prerequisites
- Electronic documents are set up.
- A delivery site exists for the channel the vendor uses.
- For incoming invoices: mappings for the vendor's items, unless the vendor uses the same item numbers as you.
Permissions
The user needs the EDOCS permission set and permission to edit vendors.
Steps
-
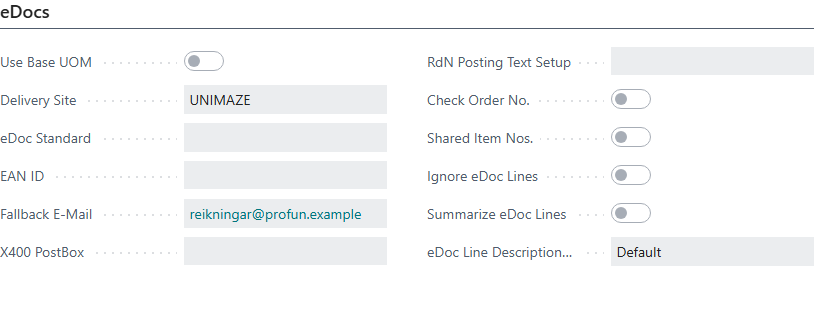
Open the vendor card and find the eDocs group.
-
Set the fields for electronic orders:
Field Effect Delivery Site The delivery site electronic orders go through. Also sets eDoc Standard. Without a delivery site, no electronic document is created when an order is released. eDoc Standard Not editable. Takes the default standard of the selected delivery site. Use Base UOM Outgoing orders use the item's base unit of measure code instead of the line's unit of measure. EAN ID The vendor's GLN. It goes on the order as the vendor's identifier and is used to find the vendor in incoming EDI documents. If Use Alternate Order Address is selected in setup, the order address's EAN ID is used when it's filled in. Fallback E-Mail The address Unimaze uses when an order is sent as JSON metadata and the vendor can't receive an electronic document. If the field is empty, the party's e-mail in the document is used and saved here. X400 PostBox The X400 mailbox for EDI documents. -
Set the fields for incoming invoices:
Field Effect RdN Posting Text Setup The format of the posting description on the purchase document. If the field is empty, the default from setup is used; see posting descriptions. Check Order No. If the invoice refers to an order, the system checks that a purchase order with that number exists. If not, you get Referenced order <no.> does not exist. An invoice without an order reference isn't stopped. To skip the check on one document, select Skip Order Reference Check on the electronic document. Shared Item Nos. Select when the vendor uses the same item numbers as you. The system asks Are you sure the Vendor has identical Item Nos. When no mapping is found, the system creates a mapping to the item with the same number, if it exists. Ignore eDoc Lines Only the purchase document header is created. The electronic document's lines aren't transferred and you enter the lines yourself. Summarize eDoc Lines Lines with the same No. are combined into one line with quantity 1, the summed amount and the description "<vendor name> - <vendor invoice no.>". Item charges are then not assigned automatically. eDoc Line Description Source Which text goes into the purchase line description: Description, Name, Description + Name, Name + Description or Description from Mapping. Default uses the setting in setup. If the selected text is empty, the item's description is used, then its name and finally the line's accounting cost. -
Nothing more is needed for electronic orders. When a purchase order or return order for the vendor is released, the system creates an electronic document, unless the vendor's invoice or credit memo is already registered on it. See Send a purchase order.

The card also has these actions:
- eDocs (Ctrl+E) opens the vendor's electronic documents.
- eDoc Mappings opens the vendor's mappings. If there are none, you get No mappings found for this vendor.
- Create eDocs creates electronic documents for the vendor's purchase orders from From Posting Date that don't already have one. At the end you get Created <count> eDocs from Purchase Orders.
Verify
- Release a test order for the vendor. A document of type Order -out should appear under eDocs.
- When the first invoice arrives, open the electronic document and choose Check Document. There should be no errors, and the purchase invoice that is created should have lines and descriptions as you set them up.
- If something stops, see Help.